Quote & Invoice Templates
In Built Templates
Sliced Invoices currently has 3 basic quote and invoice templates that you can use. And you can have a different template for quotes and a different template for invoices if you wish. You simply need to navigate to Sliced Invoices –> Invoice Settings or Sliced Invoices –> Quote Settings and choose your template design.
Customizing Invoices and Quotes
The quote and invoice templates can be easily customized to suit your business and there are several ways to do this, depending on your technical know-how. We will go through each different method in detail below and you can choose to use one method or all of them combined.
Method 1: Adding Custom CSS
 This is the simplest and most straightforward way of customizing your invoice or quote templates. Navigate to the Quote Settings or Invoice Settings page and choose the template that you would like to start with.
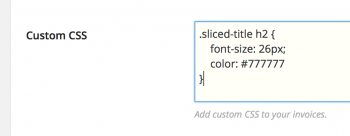
Now it is simply a matter of pasting in your CSS code into the ‘Custom CSS’ field.
This small snippet of CSS code will change the background color on the line item header and totals to a blue color as well as changing the borders to the same blue color:
.sliced-wrap .table th, .sliced-wrap .table td, .sliced-wrap .table-bordered {
    border: 1px solid #5e7fa0;
}
.sliced-wrap .table th, .sliced-wrap .table-active td, .sliced-wrap .row_odd {
    background: #5E7FA0 none repeat scroll 0 0;
    color: #fff;
}
We won’t go into a full blown CSS tutorial, but this is just an example of how easy it is to change the highlight colors of your invoices and quotes. You can of course do a lot more than this such as changing font sizes and alignment of items, using just the Custom CSS field.
Method 2: Creating Custom HTML Templates
 If you want to have complete control over the look of your templates and you know PHP and HTML, you can create your own custom template files that reside in a folder within your current WordPress theme.
The best way to get started is to copy the 3 template files that are located in wp-content/plugins/sliced-invoices/public/templates
The 3 template files are:
- sliced-invoice-display.php
- sliced-quote-display.php
- sliced-payment-display.php
Copy these files into a folder within your WordPress theme and name the folder /sliced
So if you are using the Twenty Sixteen theme, the folder structure would look something like wp-content/themes/twentysixteen/sliced/sliced-invoice-display.php
Your invoices will now use this file as the invoice template and any changes you make to this file will be shown on the invoice.
A few tips for modifying templates
All of the template files use Bootstrap v3.3 as the CSS framework.
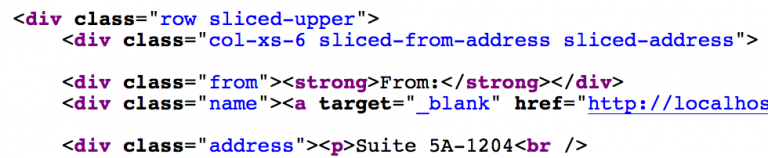
Every row, column and section on the invoice and quote templates have been given a class that will start with “sliced-“.
For example the header row has the class “sliced-header” and the column that contains the “from” address has the class “sliced-from-address”. This makes it very easy to target specific areas with your styling. So as well as using the standard Bootstrap styling, you can also have very fine grained and simple control of each section on the invoice or quote.
Most of the template tags that are used within the template files are located within wp-content/plugins/sliced-invoices/includes/template-tags/sliced-tags-display-modules.php. These template tags are basically just chunks of markup and other template tags that make displaying the various sections on the invoices and quotes easy.
Do not modify these template tags though as they will be overwritten when the plugin is updated. You can copy and paste the functions into your functions.php file and then rename them, but again we won’t dive too deep into any PHP/WordPress lessons.